In this article you will find out how to set your VPN, Dial-up or PPPoE connection to start automatically when you log on into a Windows 10 32 bit (x86) or 64 bit (x64) computer.
What is VPN, Dial-up and PPPoE?
- VPN: Virtual Private Network. In use by some companies to allow employees to connect to the company network of computers from anywhere. Uses username and password for authentication. VPN is also used to create virtual networks of computers to simulate their existence in a Local Area Network (LAN) even if individual computers or groups of computers (connected behind a router/server that is connected trough VPN) can be at different physical locations (different cities, countries or even continents);
- Dial-up: Establishing an internet connection by calling (dialing) a telephone number trough a land line and converting analog audio to digital data using an external or internal modem (deprecated). There might be cases in the world where this technology is still being used because of a lack of regional network infrastructure (isolated or remote locations) even if the computer is running Windows 10;
- PPPoE: Point to Point Protocol over Ethernet. A technology that provides an authentication mechanism and management of data transferred over Ethernet connections. Used by many ISPs (Internet Service Providers) to enforce customers to access their network, using an username and a password for accessing the Metropolitan Area Network (MAN) or the internet (World Area Network – WAN).
Step 1: Setting-up a new VPN, Dial-up or PPPoE connection in Windows 10:
For this example an ISP that provides its services over PPPoE has been taken and at which we want our computer to automatically connect without the user intervention after he is logging in. This method does not work if the user does not log in onto to the computer. For this to work before a user logs in, the method described here shroud be implemented in Windows Task Scheduler with proper access privileges. Let’s begin:
In order to set-up a new VPN, Dial-up or PPPoE connection in Windows 10 proceed as follows:
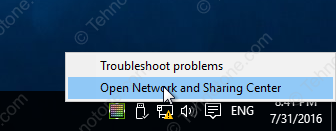
- Right-click the square computer icon on the task bar and click Open Network and Sharing Center;
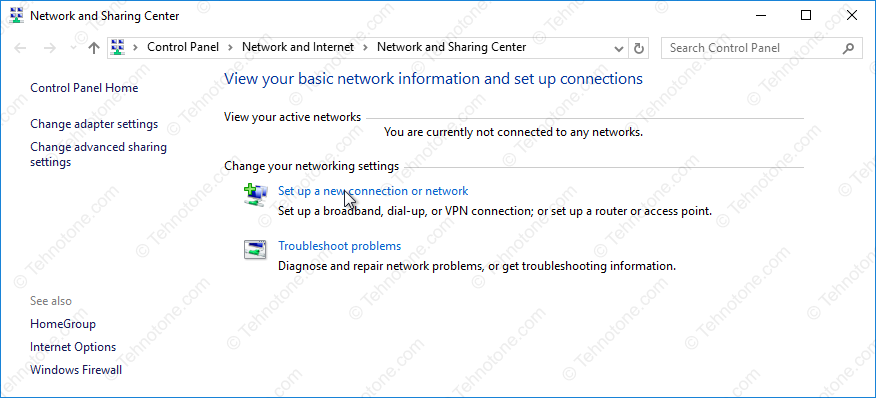
- In the window that opens, click Set up a new connection or network;
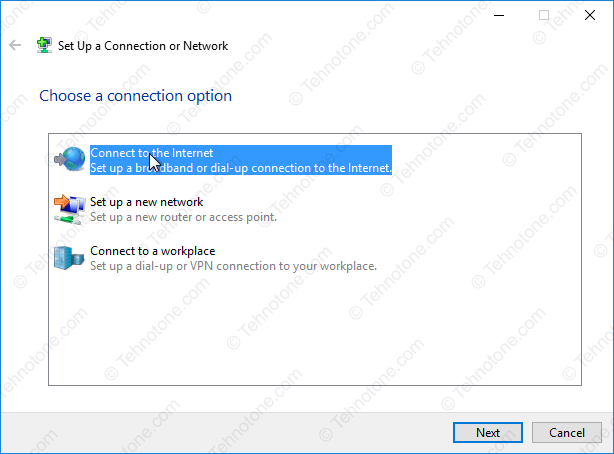
- In the Set Up a Connection or Network window choose the appropriate option for your needs. No matter what you choose, make sure you take note of the name that you are giving to this new connection. For this example we will proceed with creating a new broadband connection to the internet.
- Click on Connect to the Internet Set up a broadband or dial-up connection to the internet
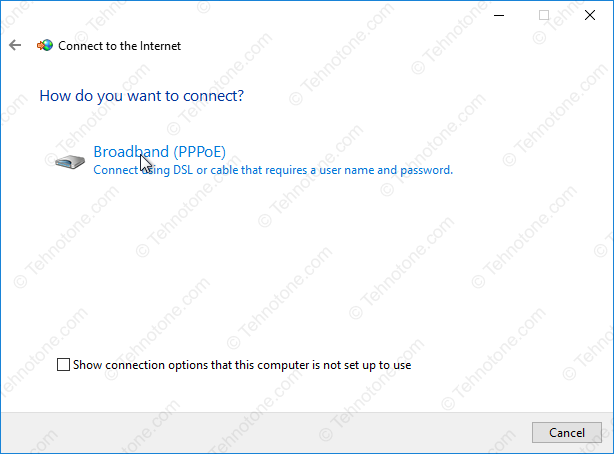
- In the Connect to the internet window, under How do you want to connect, choose Broadband (PPPoE) Connect using DSL or cable that requires a username and a password;
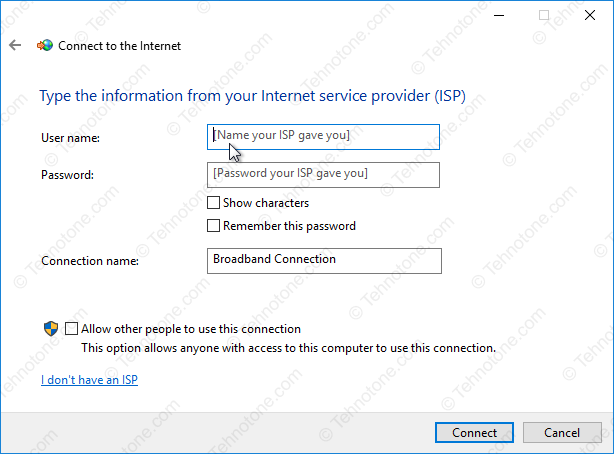
- Input the connection details which are: User name, Password and Connection name. You can check Remember this password option if you don’t want to be promoted to input a password every time this connection starts or reconnects. Make sure you note what you will write in the Connection name box, as this is a parameter that will be used in the next step. If you want this connection to be available for other users of the computer you can check the box besides Allow other people to use this connection, otherwise other user accounts on the computer or a new user account that you might create in the future will not be able to see this new connection and to connect through it;
- Do not include special characters in the Connection name. Try to keep it simple;
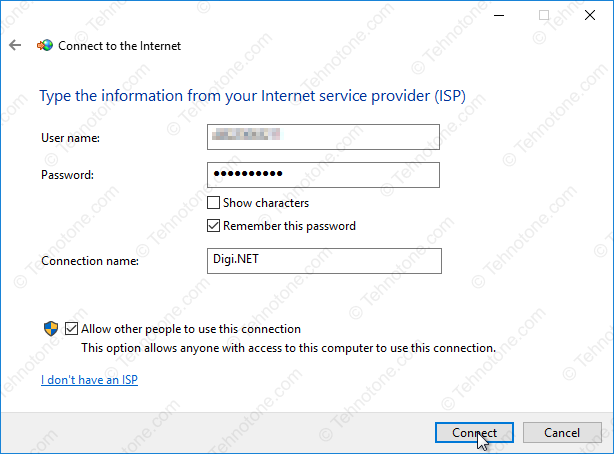
- Click on Connect button to finalise the set up of this new connection;

- A short connection test will be performed by Windows then and in case of a successful connection to the internet you will be presented with the option to Browse the internet now;
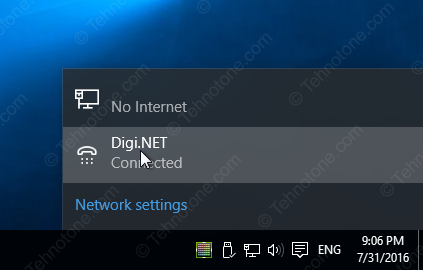
- Now you can see your new connection if you click on to the network icon located on the task bar.
Step 2:Creating a batch file that will start the network connection
A batch file is a system file with *.bat filename extension that at its execution can perform a command trough the Windows Command Prompt interface. When a batch file is being executed, a Command Prompt window will usually appear, performing the command included in to the batch file then disappear. This will also be the case of our current example.
To create the batch file proceed as follows:
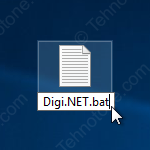
- Right click on to an empty space from the desktop or in to a File Explorer window then click New and Text document. Name it Digi.NET or any other name of your choice;

- This will create a new empty text file that you can write in to, but we don’t want to write anything into it yet;
- You need to change the extension of the file you just created from *.txt which is the standard extension used by Windows for a text file and change it to *.bat which will convert the file into a system batch file from which Windows can execute commands;
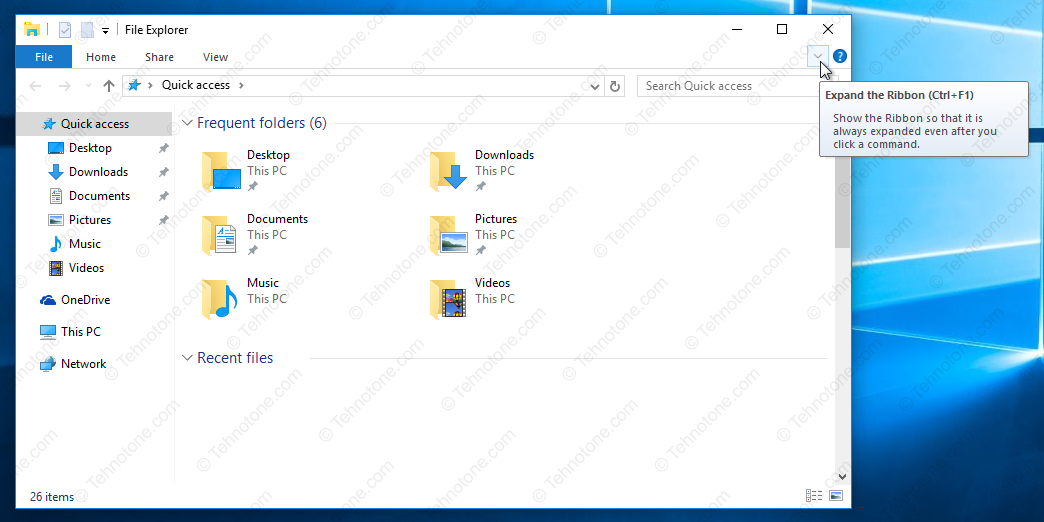
- To view files extensions that tells the system what program to use to open a file, open a File Explorer window, click on the arrow down button to open the ribbon and see all the available commands;
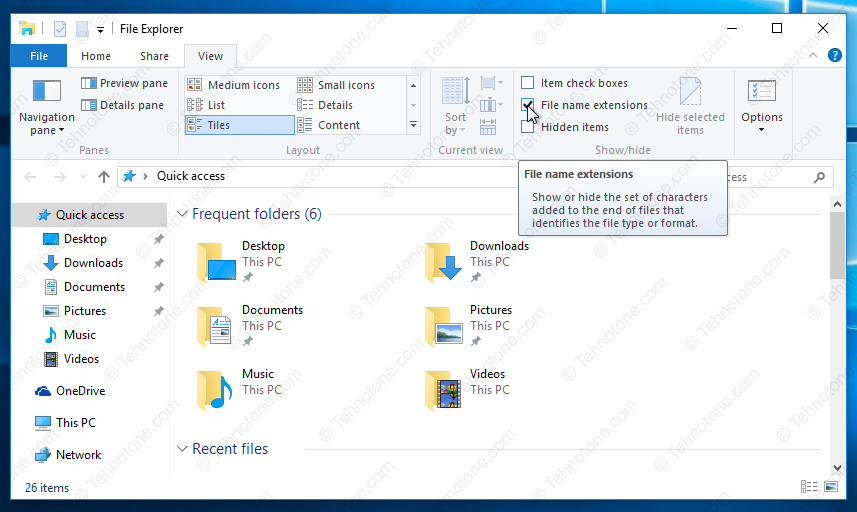
- Go to the View tab then fill the checkbox near File name extensions from the Show/hide pane. Now each file you see should have a termination or extension;
- Right click the previously created file then click Rename. Move the cursor to the end of the name (after .txt|) and write .bat instead of .txt
- Tap on Enter key from your keyboard or click somewhere else on the desktop to apply the new file name extension. Click Yes on the window that warns about the change of the file extension;
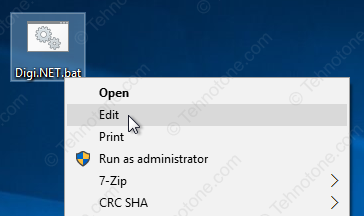
- Right click the *.bat file then click on Edit;
- Paste inside the editor the code below:
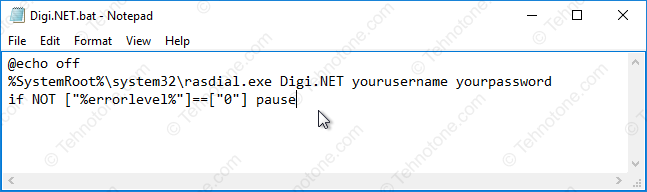
@echo off
%SystemRoot%\system32\rasdial.exe Digi.NET yourusername yourpassword
if NOT ["%errorlevel%"]==["0"] pause
- Change yourusername and yourpassword with your actual username and pasword for the connection. You could also change Digi.NET with the name of the connection you created at Step 1;
- The tree arguments that follow rasdial.exe wich are Connection name, username and password are saved in this file as plain text, unencrypted. If you don not use hard disk encryption (BitLocker or another similar solution) the information you input in this file may be accessed by others who have access to the computer. If however you intend to make this automatic connection only for one user, the file may not be accessible by other users of the computer if they do not have administrative access. This does not apply if the hard disk it’s not encrypted and could be read by other means. If the name of your connection contains one or more spaces, you have to use quotes to enque it in the *.bat file. Example:
@echo off
%SystemRoot%\system32\rasdial.exe "My new connection" yourusername yourpassword
if NOT ["%errorlevel%"]==["0"] pause
The other commands defined it the *.bat file are:
- @echo off – will prevent displaying the command on the following line in the Command Prompt Window when the *.bat file is being executed;
- if NOT [“%errorlevel%”]==[“0”] pause – if the command on the line above, (the connection attempt), generates an error, (connection is unsuccessful), pause the process keeping the CMD window open so that the user can read the error. This will allow you to understand what went wrong in case of an unsuccessful connection attempt.

- After imputing the username and the password in the *.bat file (which have to be the same as those that you used at Step 1) save the file by clicking File then Save.
- Now it’s time to test the *.bat file to see if by executing it we can launch the connection. To do this we must first disconnect:
- Click the square computer icon on the task bar then click on the name of the connection that you created at Step 1;
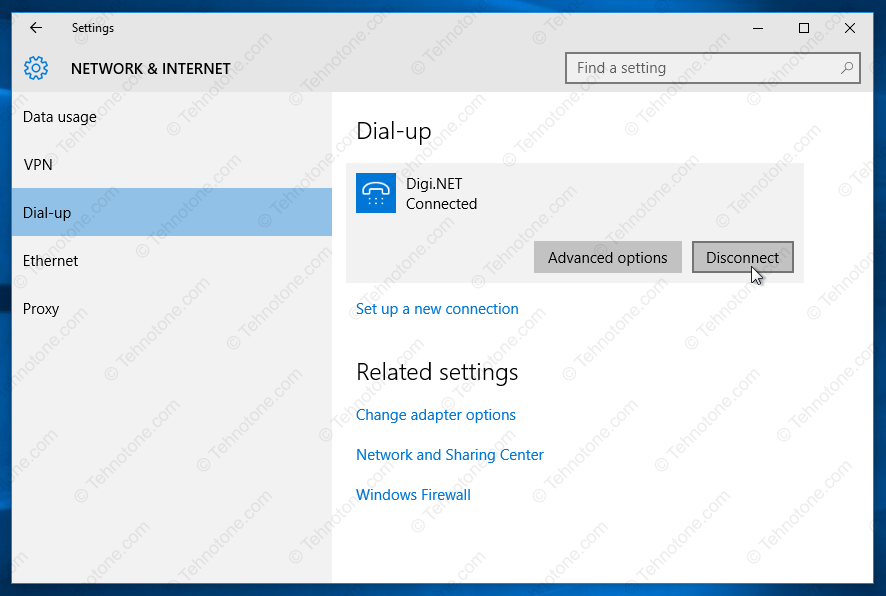
- Click on the connection name (gray rectangle) once then click on Disconnect;
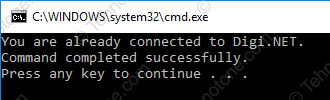
- In the image above is the result of starting the same connection using the *.bat file while being allready connected;
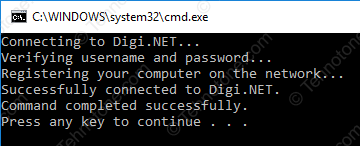
- Now double click the *.bat file and see if the connection is re-established.
- If yes, you could proceed with the next step. If no, the following explanations might help you identify the problem:
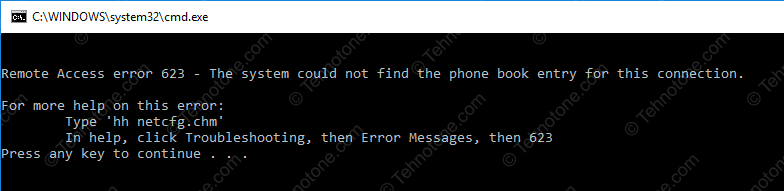
- Remote Access error 623 – The system could not find the phone book entry for this connection.
The connection name does not match any existing VPN, Dial-up or PPPoE connections. You might want to check the spelling and try again. This is the connection name that we are talking about which has the same name as the one you defined when you create the network connection. Check to be sure or even rename the connection by launching Network and sharing center > Modify adapter settings. here you can rename all the available network connections. Make sure no special characters are being used. If you use one or more spaces in the network name, you should enqueue the name in quotes in the *.bat file. Example: “My new connection“.
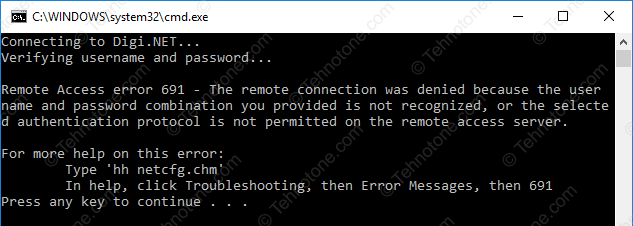
- Remote Access error 691 – The remote connection was denied because the user name and password combination you provided is not recognized, or the selected authentication protocol is not permitted on the remote access server.
You have entered an incorrect username or password. Re-check them to make sure they are correct. Save the edits to the *.bat file and try again. Even if the username and password are being retained by Windows for this connection, Rasdial.exe application will require the login information again as this is the way it works. You could skip entering the password or the username in the *.bat file and instead enter an asterisk (*) then you’ll be prompted to input them in to the CMD window in order to connect (see examples below). Rasdial.exe is a win32 application that will not automatically read the data retained by the operating system for the connection as its role is only to “dial” the connection if the critical connecting information is being provided and if it founds the connection by its name in the network connections list. If your username and/or password does contain spaces then you should write them in quotes like it’s the case with the connection name. This is because a space that is not in quotes will tell Rasdial.exe to look for the next parameter. To prevent this, quotes have to be used.
- Prompt for password:
@echo off
%SystemRoot%\system32\rasdial.exe "My new connection" yourusername *
if NOT ["%errorlevel%"]==["0"] pause
- Prompt for username and password:
@echo off
%SystemRoot%\system32\rasdial.exe "My new connection" * *
if NOT ["%errorlevel%"]==["0"] pause
- Prompt for username:
@echo off
%SystemRoot%\system32\rasdial.exe "My new connection" * yourpassword
if NOT ["%errorlevel%"]==["0"] pause
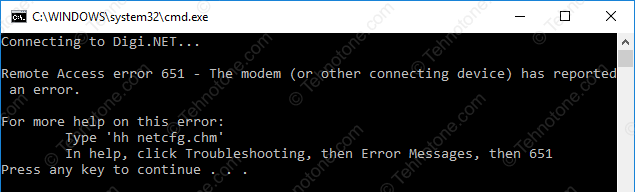
- Remote Access error 651 – The modem (or other connecting device) has reported an error.
This error is due to application not receiving any response from the device that it treys to communicate with. A special case is if you power on your modem at the same time you power on your computer. It might be the case that the modem is not ready yet to process the connection as the modem itself is not yet connected to the network. This case is being encountered with old and new devices including GPON OTNs that uses optic fiber. If the computer is started at the same time with the modem, it might reach to the desktop before the modem is connected to the network. To prevent an error due to this delay, especially if we wish to automatize this process at user login, we have to also input a delay in the *.bat file so that when the dialing is done the modem is ready to process the request (the connection). To input a delay in the *.bat file see the following example:
@echo off
timeout /t 30
%SystemRoot%\system32\rasdial.exe Digi.NET yourusername yourpassword
if NOT ["%errorlevel%"]==["0"] pause
where 30 is the number of seconds to delay the dialing of the network connection. You might need to adapt this value to your equipment.
Other reasons for a 651 error include: lack of a connection between the modem and ISP’s network, modem initialization error (that will be signaled by the modem trough a flashing orange or red light) or lack of connection between your computer’s network card adapter and the modem (including intermediary equipment) network cables, switches, etc. Last but not least is the lack of power on the modem which means that the modem is not turned on.
Step 3: Setting the batch file to run automatically after Windows 10 user logon
Now that we tested our *.bat file, is’time to put it to work at user login. Here we have two options: either we put the file to work for all users of the computer or we put it to work for a specific user:
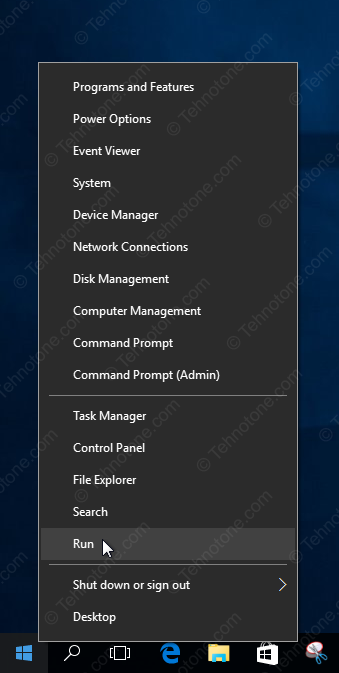
- To do this, first you have to launch the Run prompt. Right click on Windows Start button then click Run;
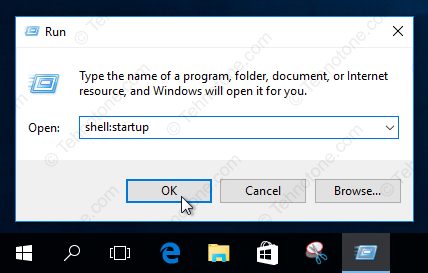
- Type shell:startup – for opening the startup folder for the user that is currently logged in
-or-
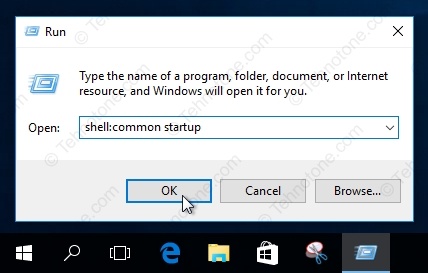
- Type shell:common startup – for opening the startup folder of all users. This will only work if the network connection you created at Step 1 has been made available to all users. (See Step 1).
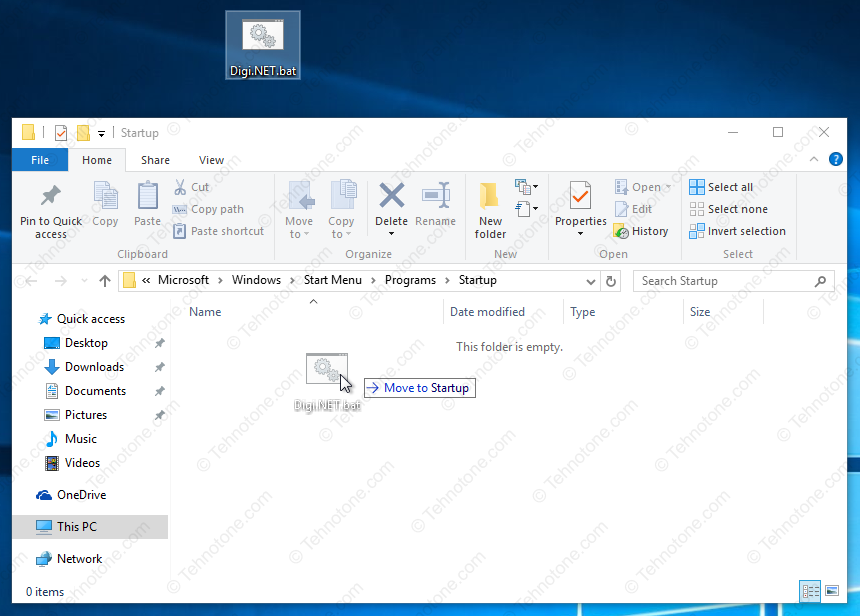
- To enable the *.bat file automatic startup at user logon in Windows 10, move, copy or drop a shortcut to the *.bat file to the desired startup folder. Do not place the *.bat file in both all users startup folder and individual user startup folder as this will execute the file twice when the individual user is logging in, which is not needed;
- You can check that the *.bat file or other application that you have placed in the startup folder will run by launching Task manager and going to the Startup tab;
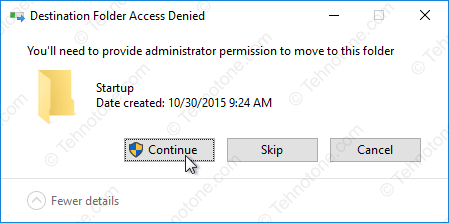
- You will need to provide administrator privileges to be able to put the *.bat file into the startup folder for all users. Also, it is harder to edit the *.bat file if it is in the startup folder because a regular user does not have read/write permission to this folder be default. The easy way is to do the editing of the *.bat file on the desktop then when the file is ready copy it on to the startup folder. Edit it again on the desktop it modifications are required then copy it or move it to the startup folder replacing the previous one;
- Other applications can be auto-launched at user login in the same manner on Windows 10. Just drop the application shortcut in to the startup folder and it’s done;
- Restart your computer to see if it works.
Best Sollution here:
Windows has feature to dial connection automatically whenever you start the computer.
Watch this:
https://www.youtube.com/watch?v=qnQx5PnScT4